“How to Change the Oil Filter on a Car.” The first time I decided to change the oil filter on my Honda Civic, I was nervous. My hands were greasy, my driveway was a mess, and I kept asking myself, How do I change the oil filter on a car without screwing it up? That squeaky-clean feeling of accomplishment when I finished, though, was worth every smudge.
If you’re staring down an oil change and wondering how to tackle the filter, I’ve got you covered. Let’s walk through it together, like we’re working side by side in my garage.
I’ve changed oil filters on my Civic, my CR-V, and even helped friends with their trucks. From stuck filters to spilled oil, I’ve learned the tricks (and mistakes) through years of DIY maintenance.
This guide is packed with my personal experiences, practical steps, and tips to make changing your car’s oil filter straightforward and stress-free. Whether you’re a first-timer or just need a refresher, I’ll show you how to get it done right, keep your engine happy, and save some cash.
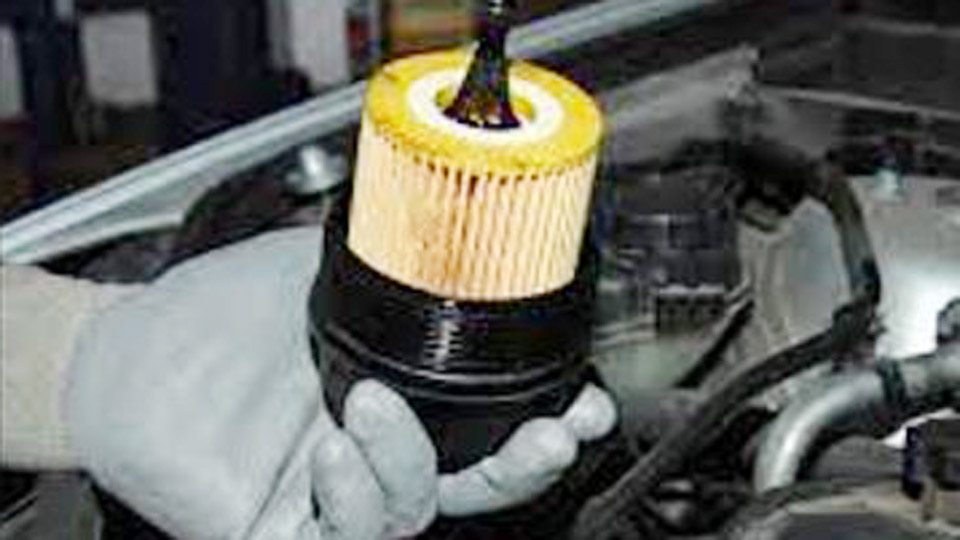
Image by indraservicepark
Why Changing Your Oil Filter Matters
Your car’s oil filter is like a gatekeeper for your engine. It traps dirt, metal particles, and sludge, ensuring clean oil lubricates your engine’s moving parts. A clogged or old filter can starve your engine of oil, causing wear or even serious damage.
I learned this when I skipped a filter change on my Civic, and the engine started sounding rougher than usual. Regularly swapping the filter—usually with every oil change—keeps your engine running smoothly and extends its life. Let’s dive into how to do it properly.
Tools and Supplies You’ll Need – How to Change the Oil Filter on a Car
Before you start, gather the right tools. I’ve found that having everything ready saves time and frustration. Here’s what I use, based on my oil changes:
- Oil filter wrench: To remove the old filter. I got a $10 universal one that works on most cars.
- New oil filter: Make sure it matches your car’s specs (more on finding the right one later).
- Engine oil: Check your manual for the correct type and amount (e.g., 5W-30 for my Civic).
- Oil drain pan: To catch old oil. I use a 5-quart pan from an auto parts store.
- Wrench or socket set: For the oil drain plug. A 17mm socket fits my Civic.
- Funnel: For pouring new oil without spills.
- Rags or paper towels: For cleanup. Oil gets everywhere!
- Gloves: To keep your hands clean and avoid skin irritation.
- Jack and jack stands (or ramps): To lift the car safely.
- Torque wrench (optional): For precise tightening of the drain plug.
Having these ready makes the job smoother. I once started without a filter wrench and spent an hour struggling to loosen the filter by hand—never again!
Finding the Right Oil Filter
Choosing the correct oil filter is critical. A wrong filter can leak or fail to protect your engine. Here’s how I ensure I get the right one for my cars.
Check Your Owner’s Manual
Your car’s manual lists the exact filter part number or specs. My Civic’s manual calls for a Honda 15400-PLM-A02, which made shopping easy. Look in the maintenance section. If you don’t have the manual, check the manufacturer’s website for a digital version.
Use Vehicle Details for Lookup
If you can’t find the manual, use your car’s year, make, model, and engine size. For my CR-V, I entered “2018 Honda CR-V, 1.5L” into AutoZone’s online tool, and it listed compatible filters like the FRAM Extra Guard PH7317. Auto parts stores also have in-store lookup systems—just tell the staff your car’s details.
Check the Old Filter
If you’re already under the car, check the old filter’s part number. When I helped my friend with his Ford F-150, we found “Motorcraft FL-500S” printed on the filter, making it easy to buy a replacement. Take a picture or write it down to match at the store.
Why This Matters – How to Change the Oil Filter on a Car
A properly fitting filter ensures a tight seal and correct oil flow. I once grabbed a cheap filter that didn’t match my SUV’s threads, causing a small leak. Double-checking compatibility saves you from engine trouble and messy cleanups.
Step-by-Step Guide to Changing Your Oil Filter
Changing an oil filter is easier than it seems, especially if you’re doing an oil change anyway. Here’s how I do it, based on countless oil changes on my Civic and CR-V. This process assumes you’re also changing the oil, as the two go hand in hand.
Prepare Your Car
Park on a flat surface and engage the parking brake. I always chock the rear wheels with a brick to be extra safe. Let the engine cool for at least 30 minutes—hot oil can burn you, as I learned when I rushed and got a nasty splash on my arm. Pop the hood to access the oil filler cap later.
Lift the Car Safely
Most oil filters are under the engine, so you’ll need to raise the car. I use a floor jack and jack stands for my Civic, ensuring it’s secure before crawling underneath. Ramps work too if you have them. Never work under a car held only by a jack—I’ve seen too many close calls.
Drain the Old Oil
Place your drain pan under the oil drain plug, usually a bolt on the bottom of the engine’s oil pan. My Civic’s plug takes a 17mm socket. Loosen the plug with a wrench and remove it by hand, letting the oil drain completely (about 5-10 minutes).
I wiggle the plug out slowly to avoid splashing. Reinstall the plug and tighten it to the manual’s torque spec (usually 25-30 ft-lbs) to prevent leaks.
Locate the Oil Filter
The filter is typically a metal canister near the engine’s bottom or side. In my Civic, it’s under the engine, near the oil pan. My CR-V’s filter is accessible from the top, which is easier. Check your manual or do a quick online search for your car’s filter location if you’re unsure.
Remove the Old Filter
Place the drain pan under the filter to catch drips. Use an oil filter wrench to loosen the filter by turning it counterclockwise. I had a stubborn filter on my CR-V once, and a strap-style wrench gave me the grip I needed.
Unscrew it by hand once loose, and check that the old gasket comes off with it. If the gasket sticks to the engine, peel it off to avoid a “double gasket” leak.
Prepare the New Filter
Before installing, rub a thin layer of fresh oil on the new filter’s rubber gasket. This trick, which I learned from my mechanic cousin, helps it seal tightly and makes removal easier next time. I use my finger to spread oil evenly around the gasket. If your car uses a cartridge filter (like some Toyotas), lubricate the O-ring instead.
Install the New Filter
Screw the new filter onto the engine’s mounting surface by hand, turning it clockwise until it’s snug. I give it an extra quarter-turn with the wrench but avoid over-tightening, which can damage the gasket or make it hard to remove later. My Civic’s filter feels secure at “hand-tight plus a nudge,” as my cousin puts it.
Refill with Fresh Oil
Lower the car back to the ground if you lifted it. Open the hood, remove the oil filler cap, and use a funnel to pour in the recommended amount of oil (check your manual—my Civic takes 4.4 quarts of 5W-20). Pour slowly to avoid spills. I add half the oil, wait a minute, then add the rest to prevent overfilling.
Check the Oil Level
After filling, replace the filler cap and start the engine for 1-2 minutes to circulate the oil. Check for leaks around the filter and drain plug. I missed a leak once on my SUV and had to clean up a mess.
Turn off the engine, wait 5 minutes, then check the oil level with the dipstick. The oil should be between the “low” and “full” marks. Add more if needed.
Dispose of Old Oil and Filter
Pour the old oil into a sealed container (I use an empty oil jug) and take it to a recycling center or auto parts store. Wrap the old filter in a plastic bag to avoid leaks. My local AutoZone accepts both for free, which makes disposal easy and eco-friendly.
Why Each Step Is Important – How to Change the Oil Filter on a Car
- Draining the oil clears out contaminants, ensuring the new filter starts with clean oil.
- Removing the old filter properly prevents leaks from a stuck gasket or cross-threading.
- Lubricating the gasket creates a tight seal, avoiding oil loss or engine damage.
- Checking for leaks catches issues early, saving you from costly repairs.
- Proper disposal protects the environment and follows local regulations.
Skipping any step, like I did when I forgot to lube the gasket once, can lead to leaks or a messy job. Take your time to do it right.
A Quick Oil Filter Change Checklist
Here’s the checklist I use to stay organized during an oil change:
| Task | Why It Matters | Check |
|---|---|---|
| Gather tools and supplies | Prevents delays or improper installation | Ensure wrench, filter, oil ready |
| Park on flat surface | Keeps car stable and safe | Engage parking brake, chock wheels |
| Drain old oil completely | Removes contaminants from engine | Use drain pan, tighten plug |
| Remove old filter | Avoids leaks from stuck gasket | Check gasket, use wrench if needed |
| Lube new filter’s gasket | Ensures tight seal, easy removal later | Apply thin layer of fresh oil |
| Install new filter | Secures proper filtration | Hand-tighten, don’t overdo it |
| Refill with correct oil | Matches engine’s needs for performance | Use manual’s recommended type |
| Check for leaks | Prevents oil loss or engine damage | Run engine, inspect filter/plug |
| Dispose of oil/filter | Protects environment, follows regulations | Take to recycling center |
This table keeps me on track, especially when I’m juggling multiple tasks.
Common Mistakes to Avoid
I’ve made my share of errors changing oil filters. Here’s what to watch out for:
- Using the wrong filter: Always double-check compatibility. I grabbed a filter for my CR-V that was off by a thread size, causing a drip.
- Over-tightening the filter: This can crush the gasket or make removal impossible next time. Hand-tight is usually enough.
- Forgetting to lube the gasket: I skipped this once, and the filter was a nightmare to remove later.
- Not checking for leaks: A small drip can turn into a big problem. Always run the engine and inspect.
- Improper disposal: Dumping oil in the trash or ground is illegal and harmful. I learned to recycle after a neighbor got fined.
Avoiding these saves time, money, and your engine’s health.
Choosing a Quality Oil Filter
Not all filters are equal. I’ve tried different brands and learned what works best:
- FRAM Extra Guard: Affordable and reliable for daily driving. I use these on my Civic.
- Mobil 1 Extended Performance: Great for synthetic oil and long intervals. My CR-V loves these.
- Bosch Premium: Durable with good filtration. I tried these on a friend’s truck.
- K&N Performance: High-flow for sporty cars, but pricey for regular use.
Stick to reputable brands and match the filter to your oil type (conventional or synthetic). I avoid cheap, no-name filters after one clogged early and hurt my Civic’s performance.
When to Change Your Oil Filter
I replace my oil filter with every oil change—every 5,000-7,500 miles for my Civic (conventional oil) and 10,000 for my CR-V (synthetic). Check your manual for your car’s schedule. Signs it’s time to change:
- Dirty oil: If your dipstick shows black or gritty oil, the filter might be clogged.
- Engine noise: A struggling filter can cause ticking or knocking, like I heard in my Civic once.
- Reduced performance: A clogged filter restricts oil flow, making the engine sluggish.
Regular changes prevent engine wear and keep your car running smoothly.
When to Call a Professional
If you’re not comfortable under the car or lack tools, a mechanic can handle it. I took my CR-V to a shop once when the filter was stuck tighter than a rusty bolt. A pro is also better for cartridge filters or hard-to-reach locations. If you notice leaks or odd engine noises after a DIY change, get it checked—don’t risk engine damage.
Keep Your Engine Happy with a Fresh Filter
Changing the oil filter on your car might seem intimidating, but it’s a skill anyone can learn. I felt like a pro the first time I finished my Civic’s oil change without a hitch, and the savings—$50 compared to a shop—felt great.
By following these steps, using the right tools, and picking a quality filter, you’ll protect your engine and boost your confidence. My Civic and CR-V are still running strong, thanks to regular maintenance like this.
Don’t let a little grease scare you. Grab your tools, find the right filter, and tackle that oil change. You’ll save money, learn something new, and keep your car purring. So roll up your sleeves, get under the hood, and enjoy the satisfaction of a job well done!
Common Questions About Changing Your Oil Filter
How often should I replace my car’s oil filter?
Replace it with every oil change, typically every 5,000-10,000 miles, depending on your car and oil type. Check your owner’s manual for specifics.
Can I reuse an oil filter?
No, old filters get clogged and can’t clean oil effectively. Always use a new one to protect your engine.
What happens if I don’t change my oil filter?
A clogged filter restricts oil flow, causing engine wear, overheating, or even failure. Regular changes prevent costly repairs.
Do I need a special tool to remove the oil filter?
An oil filter wrench helps, especially for stuck filters. A universal strap wrench works for most cars and is worth having.
Can I change the oil filter without draining the oil?
It’s messy and not recommended. Draining the oil first ensures a clean job and removes contaminants from the system.
How do I know if I installed the oil filter correctly?
Check for leaks after running the engine. The filter should be hand-tight, with no oil dripping from the seal or drain plug.