Want to refresh your car’s interior without breaking the bank? If you’re wondering how to spray paint car interior plastic, you’re in the right place. As a car enthusiast who’s spent countless weekends tinkering with my Dodge Ram and helping friends revive their Hondas and Chevys, I’ve painted plenty of faded dashboards, cracked consoles, and worn trim pieces.
Spray painting plastic interior parts is a budget-friendly way to upgrade your ride’s look, whether you’re a DIY mechanic or just a driver wanting a sharper cabin. Let’s walk through the process step-by-step, from prep to finish, with tips tailored for US car owners facing dusty Texas roads or humid Florida summers.
Why Spray Paint Car Interior Plastic
Spray painting your car’s interior plastic can transform a tired, scratched, or faded cabin into something that looks showroom-fresh. It’s a popular upgrade for older cars like my 2008 Ram or budget models like a Toyota Corolla, where plastic trim often fades or cracks over time. A good paint job can also protect surfaces, hide imperfections, and let you customize colors to match your style—think matte black for a sleek vibe or bold red for a sporty touch.
This matters because a clean, cohesive interior boosts your driving experience and can increase your car’s resale value. I once painted the faded console in my buddy’s Ford Mustang, and it went from “beater” to “head-turner” for under $50. Plus, in the USA, where sun, dust, and humidity can wreck plastic, a fresh coat of paint adds durability.
Why It Matters: A well-painted interior not only looks great but also withstands the wear and tear of daily driving, from scorching Arizona heat to salty Midwest winters.
Understanding Car Interior Plastics
Car interior plastics vary by type and finish, which affects how you paint them. Common plastics include:
- ABS (Acrylonitrile Butadiene Styrene): Found in dashboards and consoles, it’s tough but needs proper prep for paint adhesion.
- Polypropylene: Used in trim pieces, it’s slick and requires adhesion promoter.
- PVC (Polyvinyl Chloride): Common in door panels, it’s flexible and paints well with the right primer.
Each type reacts differently to paint, so prepping correctly is key. I learned this when I tried painting a slick polypropylene trim piece without primer—it peeled off in weeks.
Why It Matters: Knowing your plastic type ensures the paint sticks and lasts, especially in humid climates like Florida or dusty regions like Nevada.
Tools and Materials Needed
Before you start, gather these supplies. I’ve listed what I use, with costs for budget-conscious DIYers.
| Item | Purpose | Cost (Approx.) |
|---|---|---|
| Automotive Spray Paint | Colors and protects plastic | $5–$15/can |
| Plastic Primer | Ensures paint adhesion | $5–$10/can |
| Adhesion Promoter | Helps paint stick to slick plastics | $8–$12/can |
| Sandpaper (400–800 grit) | Smooths surfaces | $5–$10 |
| Rubbing Alcohol | Cleans grease and dirt | $2–$5 |
| Microfiber Cloths | Wipes surfaces clean | $5–$10 |
| Painter’s Tape | Masks off areas | $3–$7 |
| Drop Cloth | Protects surroundings | $5–$15 |
| Gloves and Mask | Safety during painting | $5–$10 |
| Screwdrivers | Removes trim pieces | $5–$20 |
Total Cost: $40–$100, depending on brands and whether you already own tools.
My Picks: Krylon Fusion for Plastic or Rust-Oleum Specialty Plastic Primer for paint, and 3M painter’s tape for crisp lines.
Step-by-Step Guide to Spray Painting Car Interior Plastic
Here’s how I paint interior plastic, broken down into easy steps for beginners and seasoned DIYers alike.
Step 1: Remove the Plastic Parts
If possible, remove the trim, console, or panel you’re painting. Use a screwdriver or trim removal tool to pop off pieces like door handles or vent covers. Check your car’s manual for specific instructions—some clips are tricky.
Why: Painting off the car prevents overspray on upholstery or glass. I learned this after getting paint on my Ram’s seats—cleaning was a nightmare.
Step 2: Clean the Surface
Wipe the plastic with rubbing alcohol and a microfiber cloth to remove grease, dirt, or Armor All residue. For stubborn grime, use a mild dish soap solution, then rinse and dry thoroughly.
Pro Tip: In humid areas like Louisiana, let parts dry completely to avoid trapping moisture under paint.
Step 3: Sand the Surface
Lightly sand with 400–800 grit sandpaper to rough up the plastic for better paint adhesion. Focus on glossy or slick areas. Wipe away dust with a microfiber cloth.
Warning: Don’t skip sanding on slick plastics like polypropylene—paint won’t stick without it.
Step 4: Apply Adhesion Promoter
For slick plastics (like door trim), spray a thin coat of adhesion promoter (e.g., Dupli-Color Adhesion Promoter). Hold the can 8–10 inches away and apply 1–2 light coats, letting each dry for 5–10 minutes.
Cost: $8–$12 per can, enough for multiple projects.
Step 5: Apply Plastic Primer
Spray a plastic-specific primer (e.g., Rust-Oleum Specialty Plastic Primer) in thin, even coats. Apply 2–3 coats, waiting 10–15 minutes between coats. Keep the can moving to avoid drips.
My Experience: I used Krylon Fusion primer on my Mustang’s console, and it bonded perfectly, even after years of Texas heat.
Step 6: Spray the Topcoat
Choose an automotive-grade spray paint for durability (e.g., Krylon Fusion or SEM Color Coat). Apply 3–4 thin coats, holding the can 8–12 inches away and moving steadily. Wait 10–15 minutes between coats. For a glossy finish, add a clear coat (e.g., Rust-Oleum Clear Enamel) after the color dries.
Pro Tip: Test the spray pattern on cardboard first to avoid runs or uneven coverage.
Step 7: Let It Cure
Let the painted parts cure for 24–48 hours in a dry, dust-free area. In cold climates like Minnesota, use a garage to prevent slow drying or cracking.
Step 8: Reinstall the Parts
Carefully reattach the painted pieces, ensuring clips and screws are secure. Avoid overtightening, which can crack plastic.
Cost Breakdown:
- Paint and primer: $15–$30
- Adhesion promoter: $8–$12
- Sandpaper and cleaning: $10–$15
- Total: $33–$57
Time: 2–4 hours, plus curing time.
| Step | Time | Cost | Difficulty |
|---|---|---|---|
| Remove Parts | 20–40 min | $0 | Moderate |
| Clean Surface | 10–15 min | $2–$5 | Easy |
| Sand Surface | 15–20 min | $5–$10 | Easy |
| Apply Adhesion Promoter | 15–20 min | $8–$12 | Easy |
| Apply Primer | 20–30 min | $5–$10 | Easy |
| Spray Topcoat | 30–40 min | $5–$15 | Moderate |
| Cure | 24–48 hours | $0 | Easy |
| Reinstall | 20–40 min | $0 | Moderate |
Choosing the Right Spray Paint
The paint you pick makes or breaks the project. Here’s what I look for:
- Automotive-Grade Paint: Krylon Fusion for Plastic or SEM Color Coat ($5–$15/can) are formulated for plastic and resist fading.
- Finish Type: Matte for a modern look, satin for subtle shine, or gloss for a factory finish. Add a clear coat for extra protection.
- Color Match: Match your car’s interior (e.g., black for most US cars, beige for older models). SEM offers OEM-matched colors.
- Durability: Look for UV-resistant and scratch-resistant formulas to withstand sun and wear.
My Pick: SEM Color Coat in Landau Black gave my Ram’s console a factory-fresh look that’s held up for three years.
Pros and Cons of Spray Painting Car Interior Plastic
| Pros | Cons |
|---|---|
| Affordable (under $60) | Time-consuming prep and curing |
| Customizes look | Can peel if prep is skipped |
| Hides scratches and wear | Overspray risk if not careful |
| Protects plastic from UV | Not as durable as factory finishes |
| DIY-friendly | Requires ventilation and safety gear |
Tips for Success in US Climates
US weather can affect your paint job. Here’s how to adapt:
Hot Climates (e.g., Arizona): Paint in a shaded garage to avoid fast drying, which causes runs. Use UV-resistant paint to prevent fading.
Humid Climates (e.g., Florida): Ensure parts are bone-dry before painting to avoid bubbles. Cure in a dehumidified space.
Cold Climates (e.g., Minnesota): Paint in a heated garage (above 50°F) for proper curing. Store cans indoors to maintain spray pressure.
Urban Areas (e.g., Chicago): Dust and pollen can stick to wet paint. Work in a clean, enclosed space.
Real-World Example: I painted my CR-V’s trim in humid Louisiana. Without a dehumidifier, the first coat bubbled. A second try in a dry garage worked perfectly.
Common Mistakes to Avoid
- Skipping Prep: Not cleaning or sanding leads to peeling paint. Take your time with prep.
- Overloading Paint: Thick coats cause drips. Apply thin, even layers.
- Painting in Poor Conditions: Avoid windy, humid, or cold areas—paint won’t adhere or cure properly.
- Using Non-Automotive Paint: Regular spray paint cracks and fades fast. Stick to plastic-specific formulas.
- Ignoring Safety: Paint fumes are toxic. Wear a mask and work in a well-ventilated area.
My Experience: I rushed a paint job on my Mustang’s vents in cold weather, and the paint cracked. A redo with proper heat and prep fixed it.
Maintaining Your Painted Interior
Keep your painted plastic looking fresh with these tips:
- Clean Gently: Use a mild soap solution and microfiber cloth to avoid scratching. Avoid harsh cleaners like bleach.
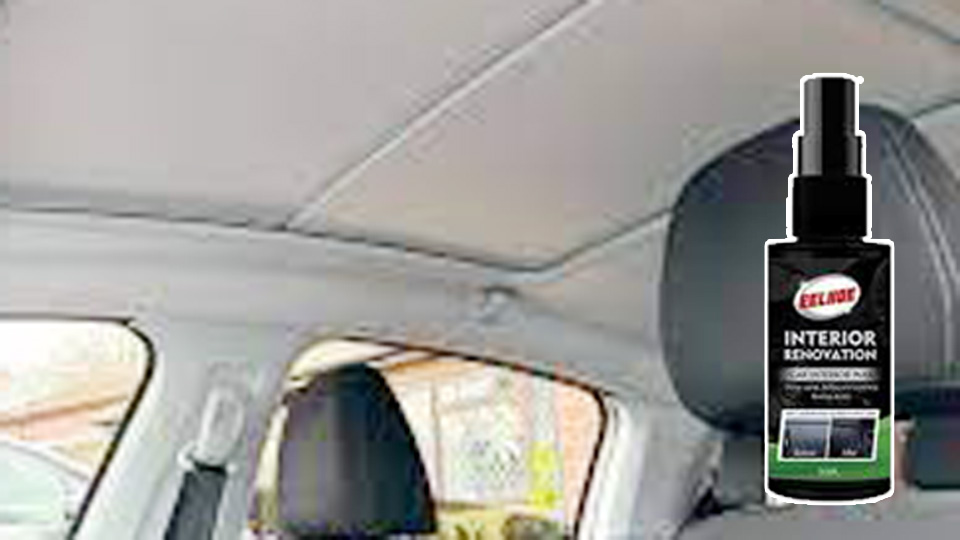
- Protect from UV: In sunny states, use a dashboard protectant (e.g., 303 Aerospace Protectant, $10) to prevent fading.
- Touch Up Scratches: Keep a spare can of your paint for quick fixes.
- Avoid Armor All: It can make painted surfaces sticky. Use a matte protectant instead.
Cost: $10–$20 for protectants and cleaners.
Painting Different Interior Parts
Different parts need slightly different approaches:
- Dashboard: Remove or mask carefully to avoid overspray on gauges. Use matte paint for a non-reflective finish.
- Console: Sand thoroughly, as consoles take a beating from elbows and drinks. Add a clear coat for durability.
- Door Panels: Use adhesion promoter for slick plastics. Tape off fabric or leather carefully.
- Vents: Remove them for even coverage. Use fine sandpaper (800 grit) to avoid scratching small details.
Real-World Tip: I painted my Ram’s door handles matte black. Removing them took 10 minutes but made painting way easier than masking.
Safety Precautions
Spray painting is safe if you’re careful:
- Ventilation: Work in a garage with open doors or use a fan to circulate air.
- Protective Gear: Wear gloves, a mask (N95 or better), and safety glasses to avoid fumes and overspray.
- Fire Safety: Keep paint cans away from flames or sparks—solvents are flammable.
- Child/Pet Safety: Keep kids and pets away from wet paint and fumes.
Warning: Don’t paint in an enclosed space without ventilation—fumes can cause dizziness or worse.
Customizing Your Interior
Spray painting opens up customization options:
- Color Choices: Black, gray, or beige match most US car interiors. Bold colors like red or blue work for show cars.
- Two-Tone Designs: Tape off sections for accents, like a silver stripe on a black console.
- Textures: Use textured spray paint (e.g., Rust-Oleum Stone) for a unique look on trim.
- Logos or Patterns: Use stencils for custom designs, like a logo on the console.
My Experience: I painted my Mustang’s vents silver to match the gauges. It took an extra hour of taping, but the custom look was worth it.
Conclusion
Spray painting your car’s interior plastic is a rewarding DIY project that can breathe new life into your ride for less than $60. With the right prep, tools, and paint, you can achieve a professional-looking finish that holds up to the rigors of US driving, from dusty rural roads to humid coastal highways.
Whether you’re hiding scratches or adding a personal touch, this guide gives you the confidence to tackle the job. Grab your sandpaper, pick a color, and transform your car’s interior into something you’re proud to show off.
Keep a small can of your chosen paint in the garage for quick touch-ups. A 30-second spray can fix a scratch before it becomes an eyesore.
FAQ
What kind of spray paint is best for car interior plastic?
Use automotive-grade plastic paint like Krylon Fusion or SEM Color Coat for durability and adhesion. Add a plastic primer for best results.
How long does spray paint last on car interior plastic?
With proper prep and a clear coat, paint can last 3–5 years. Protect it with UV-resistant products in sunny climates.
Can I paint over scratched or faded plastic?
Yes, sand scratches lightly and clean thoroughly before painting. Primer hides imperfections and ensures paint sticks.
Do I need to remove interior parts to paint them?
Removing parts is best for even coverage and no overspray, but you can mask off areas if removal is too tricky.
How do I avoid paint peeling on car interior plastic?
Clean thoroughly, sand the surface, and use adhesion promoter and plastic primer. Apply thin coats and let them cure fully.